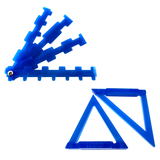
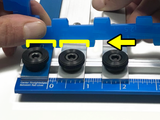
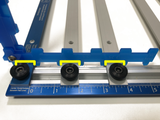
Adjust Versaguide angles and spacing up to 10 times faster with the Space Keys and Angle Stops accessories kit!
Angle Stops let you quickly and accurately set your Versaguide to the most common angles – 90, 45, 60, and 75 degrees. They also function as standalone glass scoring guides!
With over 25 commonly used measurements including a special key for 60 degree shapes like hexagons, diamonds and equilateral triangles, Space Keys will get you scoring faster. Simply place the keys on top of your Versaguide and snap the straightedges into place!
-----------------------
ANGLE STOPS INFO:
Simple to use: Choose your preferred angle and orient the correctly marked corner downward, then hold the thick side of the Angle Stop flush against the Lock Bar straightedge, and push the thinner side against the inside of the bottom rail. When both sides of the Angle Stop are flush against the Versaguide, you know it is accurately set!
Tips:
---------------------------
SPACE KEYS INFO:
Before setting spacing, always make sure the Versaguide angle is set at 90 degrees.
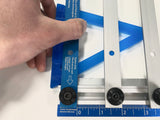
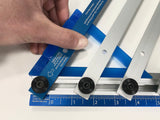
To begin, choose your desired increment Space Key. Fit the first notch of the Space Key over the Lock Bar near the Bottom Rail. Slide the straightedges to fit inside the successive notches in the key. Gently tighten the knobs on the bottom end of the straightedges. Now, repeat this procedure on the top end of the straightedges, placing the Key over the Lock Bar near the Top Rail and sliding the straightedges into the successive notches. Fully tighten the knobs on the top of the straightedges. Double check the bottom side, fitting the Key over the straightedges near the Bottom Rail, and then fully tighten the bottom knobs of the straightedges. And that’s it, you’re ready to score!
Tips:
Angle Stops let you quickly and accurately set your Versaguide to the most common angles – 90, 45, 60, and 75 degrees. They also function as standalone glass scoring guides!
With over 25 commonly used measurements including a special key for 60 degree shapes like hexagons, diamonds and equilateral triangles, Space Keys will get you scoring faster. Simply place the keys on top of your Versaguide and snap the straightedges into place!
-----------------------
ANGLE STOPS INFO:
Simple to use: Choose your preferred angle and orient the correctly marked corner downward, then hold the thick side of the Angle Stop flush against the Lock Bar straightedge, and push the thinner side against the inside of the bottom rail. When both sides of the Angle Stop are flush against the Versaguide, you know it is accurately set!
Tips:
- Be sure to slightly loosen the Lock knob with the hex key before you begin, and remember to tighten once your angle is set. Firmly press the Versaguide down against the scoring mat while tightening to keep the angle from moving.
- To set your Versaguide from a wide to an acute angle – like going from 90° to 60° - first squeeze the thick side of the Angle Stop against the Lock Bar straightedge and slide toward the bottom rail as you gently push the Versaguide to the right until the bottom of the Angle Stop is flush with the bottom rail of the Versaguide.
- To set from an acute angle to a wider angle – like going from 45° to 90° - begin by squeezing the Angle Stop flush against the bottom rail while gently pushing the Versaguide until the Lock Bar straightedge is flush against the thick part of the Angle Stop.
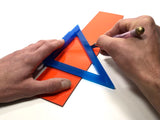
- Angle Stops are great for quickly scoring smaller pieces of glass when you only need to make a single score. Use like a t-square or speed square, with the thick edge of the Angle Stop pressed against an outside edge of your glass. You can score along both the inside or outside edges of your Angle Stop. The angles correspond to the number nearest each corner.
---------------------------
SPACE KEYS INFO:
Before setting spacing, always make sure the Versaguide angle is set at 90 degrees.
To begin, choose your desired increment Space Key. Fit the first notch of the Space Key over the Lock Bar near the Bottom Rail. Slide the straightedges to fit inside the successive notches in the key. Gently tighten the knobs on the bottom end of the straightedges. Now, repeat this procedure on the top end of the straightedges, placing the Key over the Lock Bar near the Top Rail and sliding the straightedges into the successive notches. Fully tighten the knobs on the top of the straightedges. Double check the bottom side, fitting the Key over the straightedges near the Bottom Rail, and then fully tighten the bottom knobs of the straightedges. And that’s it, you’re ready to score!
Tips:
- The closer you place the Space Keys to the Bottom and Top Rails, the more precision you can achieve.
- Each Key allows doubling or halving your spacing.
- For double spacing, simply fit the Space Keys over the Lock Bar, and slide the straightedges into every other notch. For even wider spacing, skip two or more notches, for example, get three or four inch spacing by skipping notches in the 1 inch Space Key.
- For half spacing, choose a Key to space your straightedges at your desired increment and score your glass. Then, use the half increment indicator on the same key to mark the glass. Place one of the prongs of your desired Key against the edge of your glass and mark your glass where you see the half increment indicator on your Key. Now line your Versaguide up to the mark on your glass, ensuring the wheel of your cutter head will run directly over the mark. Score your glass. These scores will appear directly between your previous scores.


